本文主要介绍搭建Mongodb分片集群的搭建步骤
一.Mongdb分片集群特点
①应用全透明,无特殊处理
②数据自动均衡
③动态扩容,无须下线
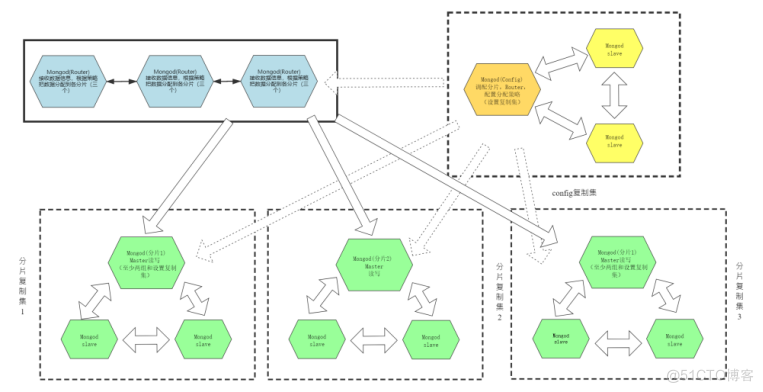
二.Mongdb分片集群原理图
三.Mongodb分片集群的搭建步骤
1.获取mongodb版本
https://www.mongodb.com/try/download/community
2.服务器规划
本次搭建用到三台8核16G的服务器,分别创建5个实例
|
|
10.200.4.61
|
10.200.4.62
|
10.200.4.63
|
|
congfig
|
25000
|
25000
|
25000
|
|
shard1
|
25001
|
25001
|
25001
|
|
shard2
|
25002
|
25002
|
25002
|
|
shard3
|
25003
|
25003
|
25003
|
|
mongos
|
27017
|
27017
|
27017
|
3.三台服务器创建配置目录
mkdir -p /home/bob/usr/mongodb/mongos/log
  mkdir -p /home/bob/usr/mongodb/config/data
  mkdir -p /home/bob/usr/mongodb/config/log
  mkdir -p /home/bob/usr/mongodb/shard1/data
  mkdir -p /home/bob/usr/mongodb/shard1/log
  mkdir -p /home/bob/usr/mongodb/shard2/data
  mkdir -p /home/bob/usr/mongodb/shard2/log
  mkdir -p /home/bob/usr/mongodb/shard3/data
  mkdir -p /home/bob/usr/mongodb/shard3/log
  mkdir -p /home/bob/usr/mongodb/etc
4.上传安装包并解压
cd /home/bob/usr/mongodb/
tar zxvf MongoDB.tar.gz
5.三台服务器创建congfig配置文件(三台服务器都需操作)
vim /home/bob/usr/mongodb/conf/config.conf
    pidfilepath = /home/bob/usr/mongodb/config/log/configsrv.pid
    dbpath = /home/bob/usr/mongodb/config/data
    logpath = /home/bob/usr/mongodb/config/log/congigsrv.log
    logappend = true
    bind_ip = 0.0.0.0
    port = 25000
    fork = true
    configsvr = true
    replSet=configs
    maxCnotallow=20000
6.三台服务器shard1配置文件
vim /home/bob/usr/mongodb/conf/shard1.conf
    pidfilepath = /home/bob/usr/mongodb/shard1/log/shard1.pid
    dbpath = /home/bob/usr/mongodb/shard1/data
    logpath = /home/bob/usr/mongodb/shard1/log/shard1.log
    logappend = true
    bind_ip = 0.0.0.0
    port = 25001
    fork = true
    replSet=shard1
    shardsvr = true
    maxCnotallow=20000
7.三台服务器shard2配置文件
vim /home/bob/usr/mongodb/conf/shard2.conf
    pidfilepath = /home/bob/usr/mongodb/shard2/log/shard2.pid
    dbpath = /home/bob/usr/mongodb/shard2/data
    logpath = /home/bob/usr/mongodb/shard2/log/shard2.log
    logappend = true
    bind_ip = 0.0.0.0
    port = 25002
    fork = true
    replSet=shard2
    shardsvr = true
    maxCnotallow=20000
8.三台服务器shard3配置文件
  vim /home/bob/usr/mongodb/conf/shard3.conf
    pidfilepath = /home/bob/usr/mongodb/shard3/log/shard3.pid
    dbpath = /home/bob/usr/mongodb/shard3/data
    logpath = /home/bob/usr/mongodb/shard3/log/shard3.log
    logappend = true
    bind_ip = 0.0.0.0
    port = 25003
    fork = true
    replSet=shard3
    shardsvr = true
    maxConns=20000
9.三台服务器mongos配置文件
  vim /home/bob/usr/mongodb/conf/mongos.conf
    pidfilepath = /home/bob/usr/mongodb/mongos/log/mongos.pid
    logpath = /home/bob/usr/mongodb/mongos/log/mongos.log
    logappend = true
    bind_ip = 0.0.0.0
    port = 27017
    fork = true
    configdb = configs/10.200.4.61:25000,10.200.4.62:25000,10.200.4.63:25000
    maxConns=20000
10.配置服务器搭建副本集
10.1 三台服务器启动config server
/home/bob/usr/MongoDB/bin/mongod -f /home/bob/usr/MongoDB/conf/config.conf
10.2 任意一服务器初始化副本集
  /home/bob/usr/MongoDB/bin/mongo --port 25000
    > use admin
      > config = {_id : "configs",members : [{_id : 0,host : "10.200.4.61:25000" },{_id : 1,host : "10.200.4.62:25000" },{_id : 2,host : "10.200.4.63:25000" }]}
    > rs.initiate(config)   #初始化副本集
11.三台第一个分片服务器搭建副本集
11.1 三台服务器启动第一个分片
/home/bob/usr/MongoDB/bin/mongod -f /home/bob/usr/MongoDB/conf/shard1.conf
11.2 第一台服务器(10.200.4.61)初始化副本集
   /home/bob/usr/MongoDB/bin/mongo --port 25001
   > use admin
   > config = {_id : "shard1",members : [{_id : 0, host : "10.200.4.61:25001" },{_id : 1, host : "10.200.4.62:25001" },{_id : 2, host : "10.200.4.63:25001" , arbiterOnly: true }]}
   > rs.initiate(config);
12.三台第二个分片服务器搭建副本集
12.1 三台服务器启动第二个分片
/home/bob/usr/MongoDB/bin/mongod -f /home/bob/usr/MongoDB/conf/shard2.conf
12.2 第二台服务器(10.200.4.62)初始化副本集
  /home/bob/usr/MongoDB/bin/mongo --port 25002
  > use admin
  > config = {_id : "shard2",members : [{_id : 0, host : "10.200.4.61:25002" , arbiterOnly: true },{_id : 1, host : "10.200.4.62:25002" },{_id : 2, host : "10.200.4.63:25002" }]}
  > rs.initiate(config);
13.三台第三个分片服务器搭建副本集
13.1 三台服务器启动第三个分片
/home/bob/usr/MongoDB/bin/mongod -f /home/bob/usr/MongoDB/conf/shard3.conf
13.2 第三台服务器(10.200.4.63)初始化副本集
  /home/bob/usr/MongoDB/bin/mongo --port 25003
  > use admin
  > config = {_id : "shard3",members : [{_id : 0, host : "10.200.4.61:25003" },{_id : 1, host : "10.200.4.62:25003" , arbiterOnly: true },{_id : 2, host : "10.200.4.63:25003" }]}
  > rs.initiate(config);
14.三台路由服务器搭建副本集
14.1 三台服务器启动路由实例
/home/bob/usr/MongoDB/bin/mongos -f /home/bob/usr/MongoDB/conf/mongos.conf
14.2 进入任一台mongos添加上述搭建搭建好的副本集配置
  /home/bob/usr/MongoDB/bin/mongo --port 27017
  use admin
  sh.addShard("shard1/10.200.4.61:25001,10.200.4.62:25001,10.200.4.63:25001")
  sh.addShard("shard2/10.200.4.61:25002,10.200.4.62:25002,10.200.4.63:25002")
  sh.addShard("shard3/10.200.4.61:25003,10.200.4.62:25003,10.200.4.63:25003")
  sh.status()   #查看状态
15.配置服务器主节点配置密码(10.200.4.61)
/home/bob/usr/MongoDB/bin/mongo --port 25000
> use admin
> db.createUser({user:"root",pwd:"juphoon419708",roles:[{role:"root",db:"admin"}]})
16.第一分片服务器主机点配置密码(10.200.4.61)
/home/bob/usr/MongoDB/bin/mongo --port 25001
> use admin
> db.createUser({user:"root",pwd:"juphoon419708",roles:[{role:"root",db:"admin"}]})
17.第二分片服务器主机点配置密码(10.200.4.62)
/home/bob/usr/MongoDB/bin/mongo --port 25002
> use admin
> db.createUser({user:"root",pwd:"juphoon419708",roles:[{role:"root",db:"admin"}]})
18.第三分片服务器主机点配置密码(10.200.4.63)
/home/bob/usr/MongoDB/bin/mongo --port 25003
> use admin
> db.createUser({user:"root",pwd:"juphoon419708",roles:[{role:"root",db:"admin"}]})
19.配置开启各实例间的密码认证
echo 'auth = true' >> /home/bob/usr/MongoDB/conf/config.conf
echo 'keyFile = /home/bob/usr/MongoDB/etc/mongo-keyfile' >> /home/bob/usr/MongoDB/conf/config.conf
echo 'auth = true' >> /home/bob/usr/MongoDB/conf/shard1.conf
echo 'auth = true' >> /home/bob/usr/MongoDB/conf/shard2.conf
echo 'auth = true' >> /home/bob/usr/MongoDB/conf/shard3.conf
echo 'keyFile = /home/bob/usr/MongoDB/etc/mongo-keyfile' >> /home/bob/usr/MongoDB/conf/shard1.conf
echo 'keyFile = /home/bob/usr/MongoDB/etc/mongo-keyfile' >> /home/bob/usr/MongoDB/conf/shard2.conf
echo 'keyFile = /home/bob/usr/MongoDB/etc/mongo-keyfile' >> /home/bob/usr/MongoDB/conf/shard3.conf
echo 'keyFile = /home/bob/usr/MongoDB/etc/mongo-keyfile' >> /home/bob/usr/MongoDB/conf/mongos.conf
20.重启分片集群
20.1关闭(每台服务器逐个实例类型进行关闭)
/home/bob/usr/MongoDB/bin/mongod -f /home/bob/usr/MongoDB/conf/config.conf --shutdown
/home/bob/usr/MongoDB/bin/mongod -f /home/bob/usr/MongoDB/conf/shard1.conf --shutdown
/home/bob/usr/MongoDB/bin/mongod -f /home/bob/usr/MongoDB/conf/shard2.conf --shutdown
/home/bob/usr/MongoDB/bin/mongod -f /home/bob/usr/MongoDB/conf/shard3.conf --shutdown
kill掉mongos进程
20.2启动(每台服务器逐个实例类型进行启动)
/home/bob/usr/MongoDB/bin/mongod -f /home/bob/usr/MongoDB/conf/config.conf
/home/bob/usr/MongoDB/bin/mongod -f /home/bob/usr/MongoDB/conf/shard1.conf
/home/bob/usr/MongoDB/bin/mongod -f /home/bob/usr/MongoDB/conf/shard2.conf
/home/bob/usr/MongoDB/bin/mongod -f /home/bob/usr/MongoDB/conf/shard3.conf
/home/bob/usr/MongoDB/bin/mongos -f /home/bob/usr/MongoDB/conf/mongos.conf
以上是Mongodb分片集群的搭建步骤